Amazon Lightsail is a virtual private server (VPS) provider and is the easiest way to get started with AWS for developers, small businesses, students, and other users who need a solution to build and host their applications on cloud. - https://aws.amazon.com/lightsail/faq/
Its supports instances, containers, databases and many other simple AWS features. For this post I will focus on containers. I initially made this post following Getting Started with Amazon Lightsail Containers: An Easy-to-Use Containers Service - AWS Online Tech Talks and then later fixed my mistakes following How to Setup an Nginx Reverse Proxy
Additional blog post Lightsail Containers: An Easy Way to Run your Containers in the Cloud
Setup
Access command-line interface
The user needs to have full access or specific access to Lightsail actions.
- Create a policy, search for service
lightsail - Allowed actions
1 | GetContainerServices (no resources need to be set) |
I eventually gave up and selected All Lightsail actions (lightsail:*) hence using the FullAccess suffix below.
- Tag the infastructure, it is best practice and can be used for audits and other automation
- Create policy as
CarlLightsailFullAccess - Attach the new policy to your
User Groupunder permissions, its best practice to add users to groups so they inherit policys
- Lightsail CLI v2
- Lightsail CLI v1 (they will probably deprecate this at some point)
- Actions, resources, and condition keys for Amazon Lightsail
- Create an access key to use the Amazon Lightsail API or the AWS Command Line Interface
Errors
- Invalid choice: ‘push-container-image’, maybe you meant
When I first tried running push-container-image I got the error Invalid choice: 'push-container-image', maybe you meant: ... which meant I needed to updated the CLI to v2. I ended up un-installing v1 to get it to work.
- The Lightsail Control (lightsailctl) plugin was not found
I also got the error The Lightsail Control (lightsailctl) plugin was not found, I fixed this following the post Install the lightsailctl plugin on Windows
Containers: Command Line Interface
As I have more than one local profile I add --profile carlos to these commands. All the code used below is at https://github.com/carlpaton/LightsailDemo and the AWS example is at https://github.com/awsgeek/lightsail-containers-nginx
- Clone the code and hop into the folder
1 | git clone https://github.com/carlpaton/LightsailDemo |
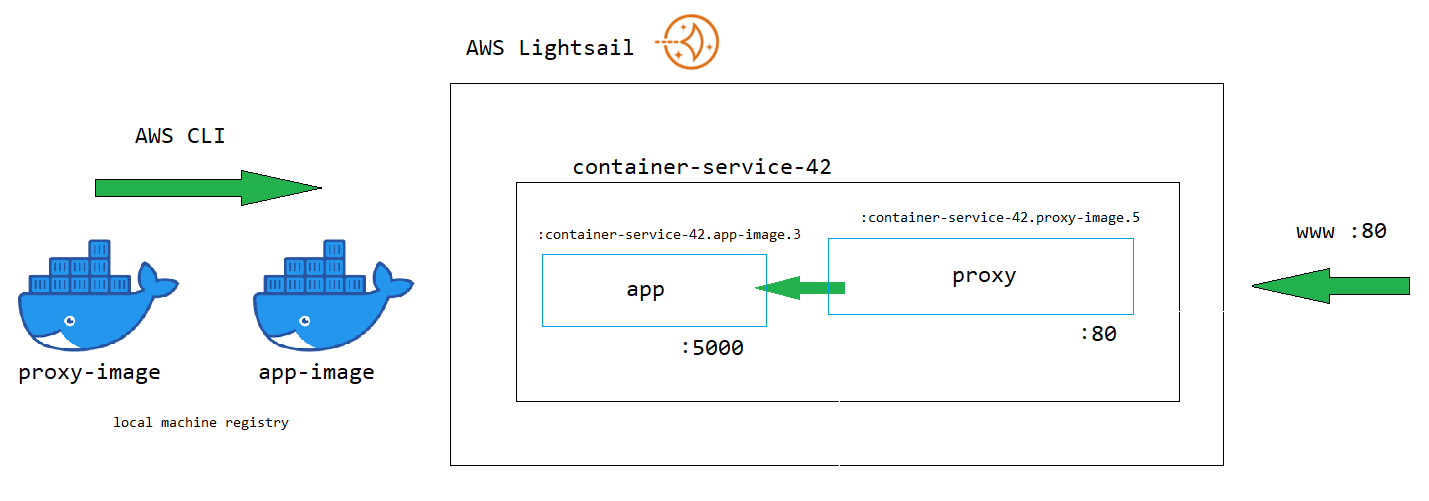
- Create the container service and query the service. The name will used in the public domain, example
containerservice42so the complete URL could behttps://containerservice42.xxx.ap-southeast-2.cs.amazonlightsail.com/
1 | aws --profile carlos lightsail create-container-service --service-name containerservice42 --power micro --scale 1 |
- Build the application container and test it locally
1 | docker rm -f app-container // trash existing from past tests |
We also need to build the proxy image if its going to be used.
1 | docker rm -f proxy-container |
Testing the proxy image is not 100% possible as it will probably need host.docker.internal:5000 in the place of server ${APP_HOST}:${APP_PORT}; but you can atleast test the config for syntax errors.
1 | docker run --env APP_HOST=localhost --env APP_PORT=5000 --env NGINX_ENVSUBST_OUTPUT_DIR=/ect/nginx --name proxy-container -p 82:80 -d proxy-image |
- Push the container to lightsail, you can do this many times and the docker tag (the number right at the end) will increment for you. The local image name is not used in Lightsail - they will refere to it as
SERVICE-NAME.LABLE-NAME.1where 1 is the version which increments.
1 | aws --profile carlos lightsail push-container-image --service-name containerservice42 --image app-image --label app-image |
This will do some AWS and Docker magic - note the image name returned, example :containerservice42.app-image.3. Container images sourced from your Lightsail container service, that are registered and stored on your service, start with a colon :.
We also need to push the proxy image if its going to be used.
1 | aws --profile carlos lightsail push-container-image --service-name containerservice42 --image proxy-image --label proxy-image |
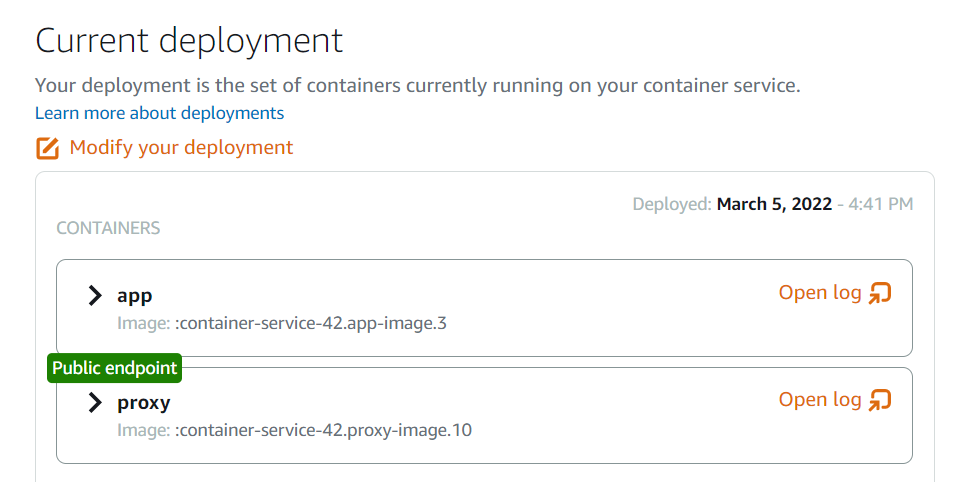
Returned name :containerservice42.proxy-image.10
- Deploy the container. The parameters
--containersand--public-endpointare respectivelymapandstructuretypes so its far easier to represent them as JSON and usefileto reference the JSON. The command needs to be run in the directory that the JSON files exist. All the source code is here.
1 | aws --profile carlos lightsail create-container-service-deployment --service-name containerservice42 --containers file://containers.json --public-endpoint file://public-endpoint.json |
If you dont want to use the proxy then just set the public endpoint in public-endpoint.json to be as the below and remove the proxy attribute and its children from containers.json
- public-endpoint.json
1 | { |
- containers.json
1 | { |
- View the status of the service
1 | aws --profile carlos lightsail get-container-services --service-name containerservice42 |
- You can then cleanup by deleting the service, this will also delete the images
1 | aws --profile carlos lightsail delete-container-service --service-name containerservice42 |
- Getting Started with Amazon Lightsail Containers: An Easy-to-Use Containers Service - AWS Online Tech Talks
- lightsail API Operations (Actions)
- How to Serve a Flask App with Amazon Lightsail Containers
- Container services in Amazon Lightsail
Instances
I though this post to Publish a .NET application to a Windows Server instance in Amazon Lightsail was really good. I followed it to setup a Windows Server instance which ran IIS and Crystal Reports.