Updated 28/01/2025
A space to keep track of all the parts needed to build this quad.
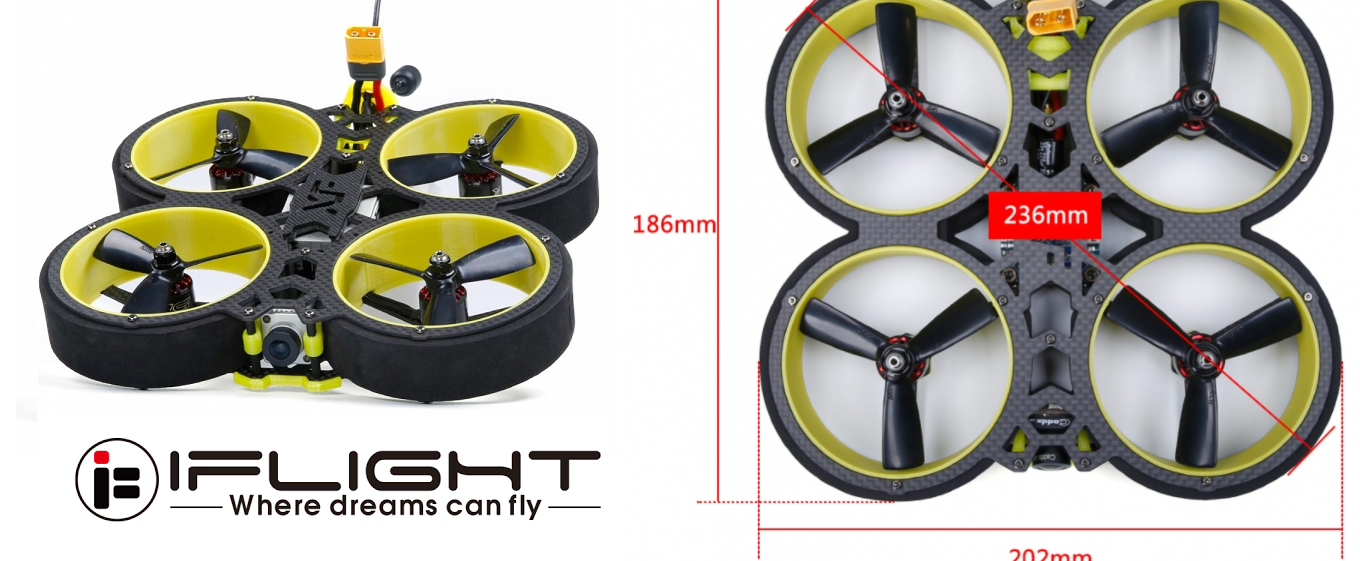
Frame
- iFlight CineWhoop V3 HD Bumblebee
Flight controllers
- My board is a
DIAT/MAMBAF722_I2C(STM32F7X2)(Diatone MAMBA AIO F722 MK1 35A 6S 8bit Flight Controller Stack 25.5mm/M2) - Betaflight F4 flight controller
- Diatone MAMBA F405 DJI FC
- Diatone Mamba F405 MK2 DJI Flight Controller
ESC
40 amp seems to be the standard but depending on the props and motors I guess 20 would work too.
Motors
My motors are BrotherBobby 1806 2850KV
18is the diameter in mm of the stator inside and06is its height.- the motor uses m3 cap-screws so I drilled the frame and added some super glue to help it from tearing
This frame is 12x12 m2 for the motors and these are the suggested motors from iflight:
- 4S XING 1408 3600KV (I think this was V1/V2)
- 4S XING 2203.5 3600KV (currently shipped with V3 of the frame)
The KV rating is how fast it spins, Im never sure what KV to choose by my observations are
- around 2000kv is 6s (3 inch quad)
- around 3500kv is 4s (3 inch quad)
- around 4200kv is 4s (4 inch quad) but that would need to be 2204 (so physically bigger motor)
Battery
- Mine are CNHL Black 1300mAh 100c
- From what Ive seen online up to 1550mAh will work(6-7 minutes flight time w/GoPro Hero8)
Betaflight
You can download Betaflight Configurator from github, look for the assets drop down.
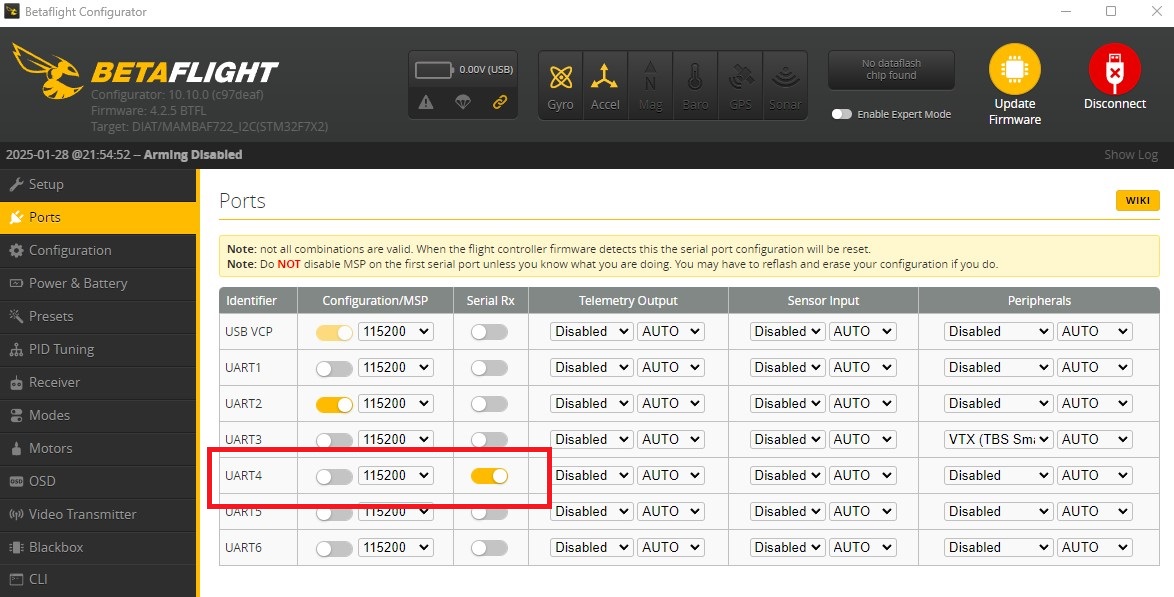
MAMBAF722
Some settings like Modes are the same as the OMNIBUSF4SD
Ports
This means my SBUS (orange signal wire) to the Futaba RX is connected to RX 4 on the MAMBAF722 controller. The brown is connected to G and the red is connected to 5V
Configuration
1 | AIRMODE: Enabled |
Motors
1 | Mixer: QUAD X |
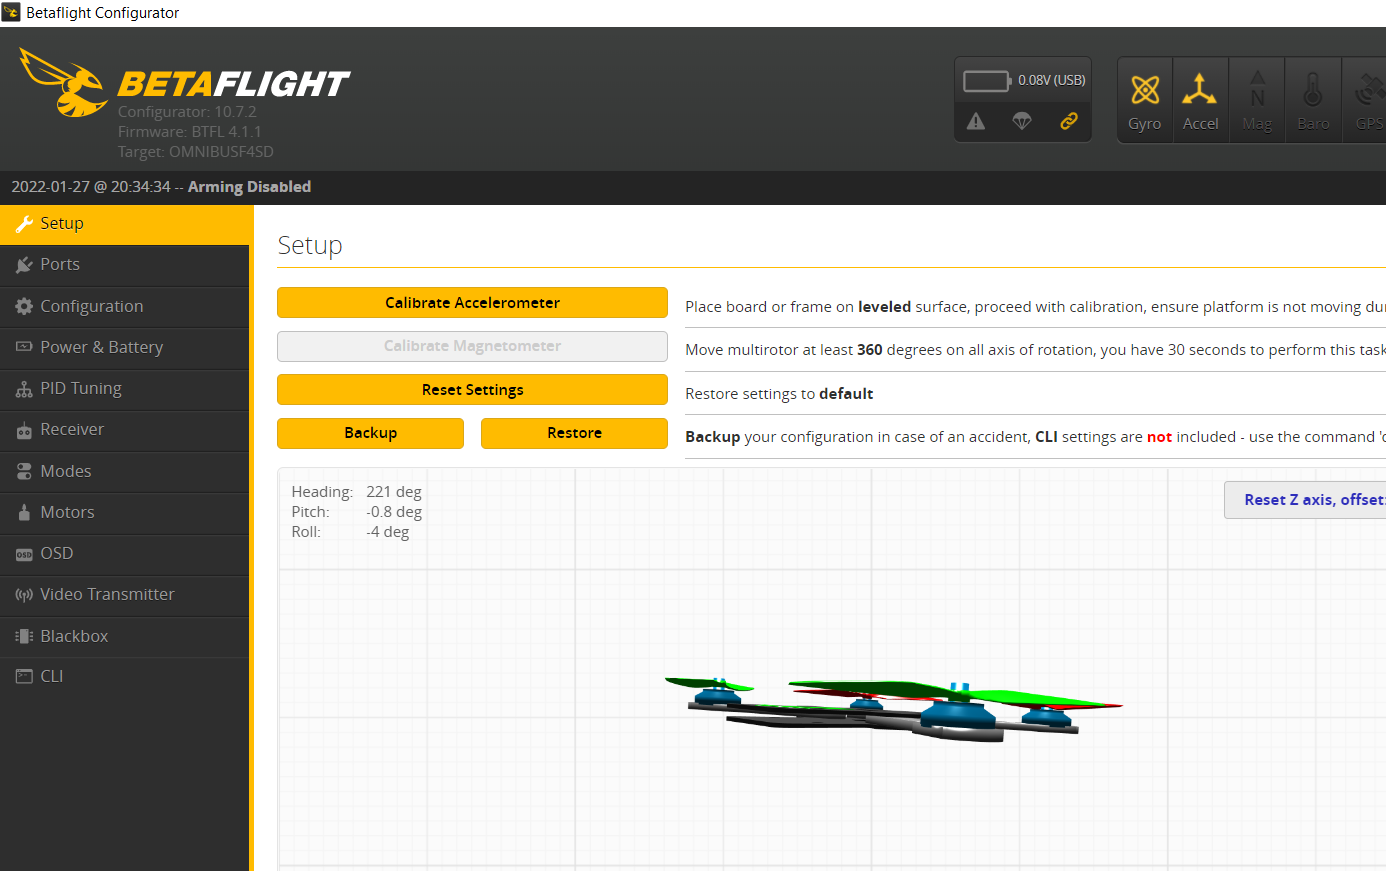
OMNIBUSF4SD
This controller was second hand and kept dropping power so I bought the MAMBAF722 and moved over to it.
Setup
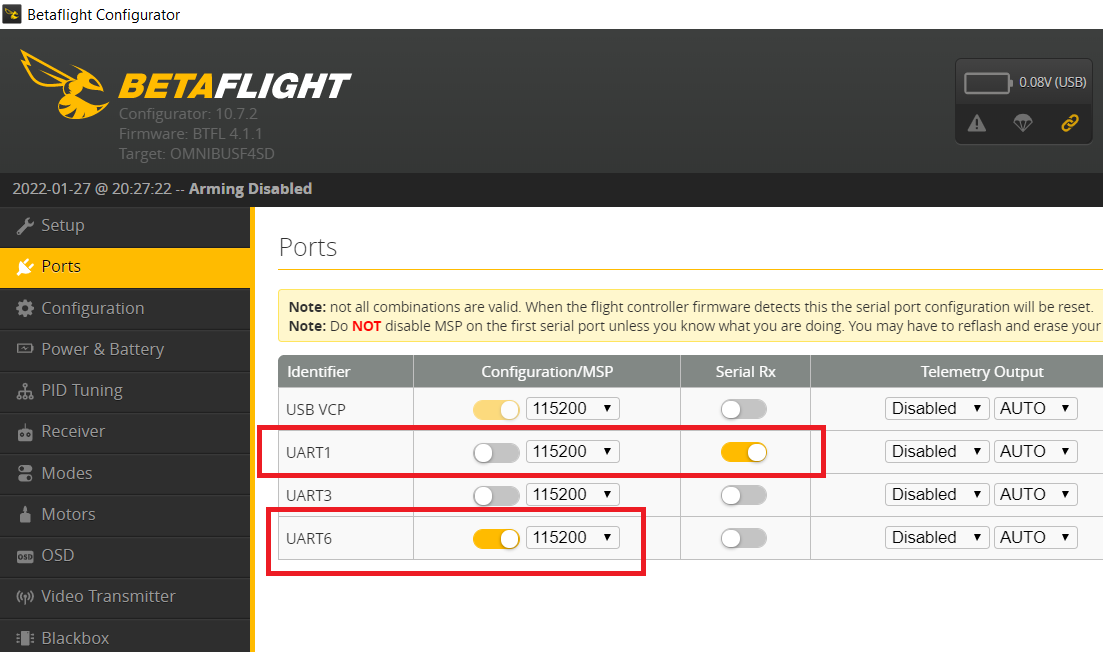
Ports
- This means the DJI white wire is connected to
TX6and the DJI grey wire is connected toRX6 - The controller had a
SBUSpad which I used for the orange signal wire to the Futaba RX, Futaba brown wire went to-and Futaba red wire went to5V. - My assumption is
SBUSisUART1so enabled Serial Rx
Configuration
- Mixer=Quad X : set the motors orientation
- System configuration : I set the gyro & loop frequency to
8.00 kHzwhich is the highest. I dont think you can change the gyro speed on a F7 board. - ESC/Motor Features : DSHOT600 is the fastest
- Board and Sensor Alignment : Yaw Degrees rotates the flight controller if you could not set it facing forward (look for an arrow on the board). Sensible values are
0, 90, 180 or 270 - Arming : 180 is sensible so you can arm it on a surface that is not level
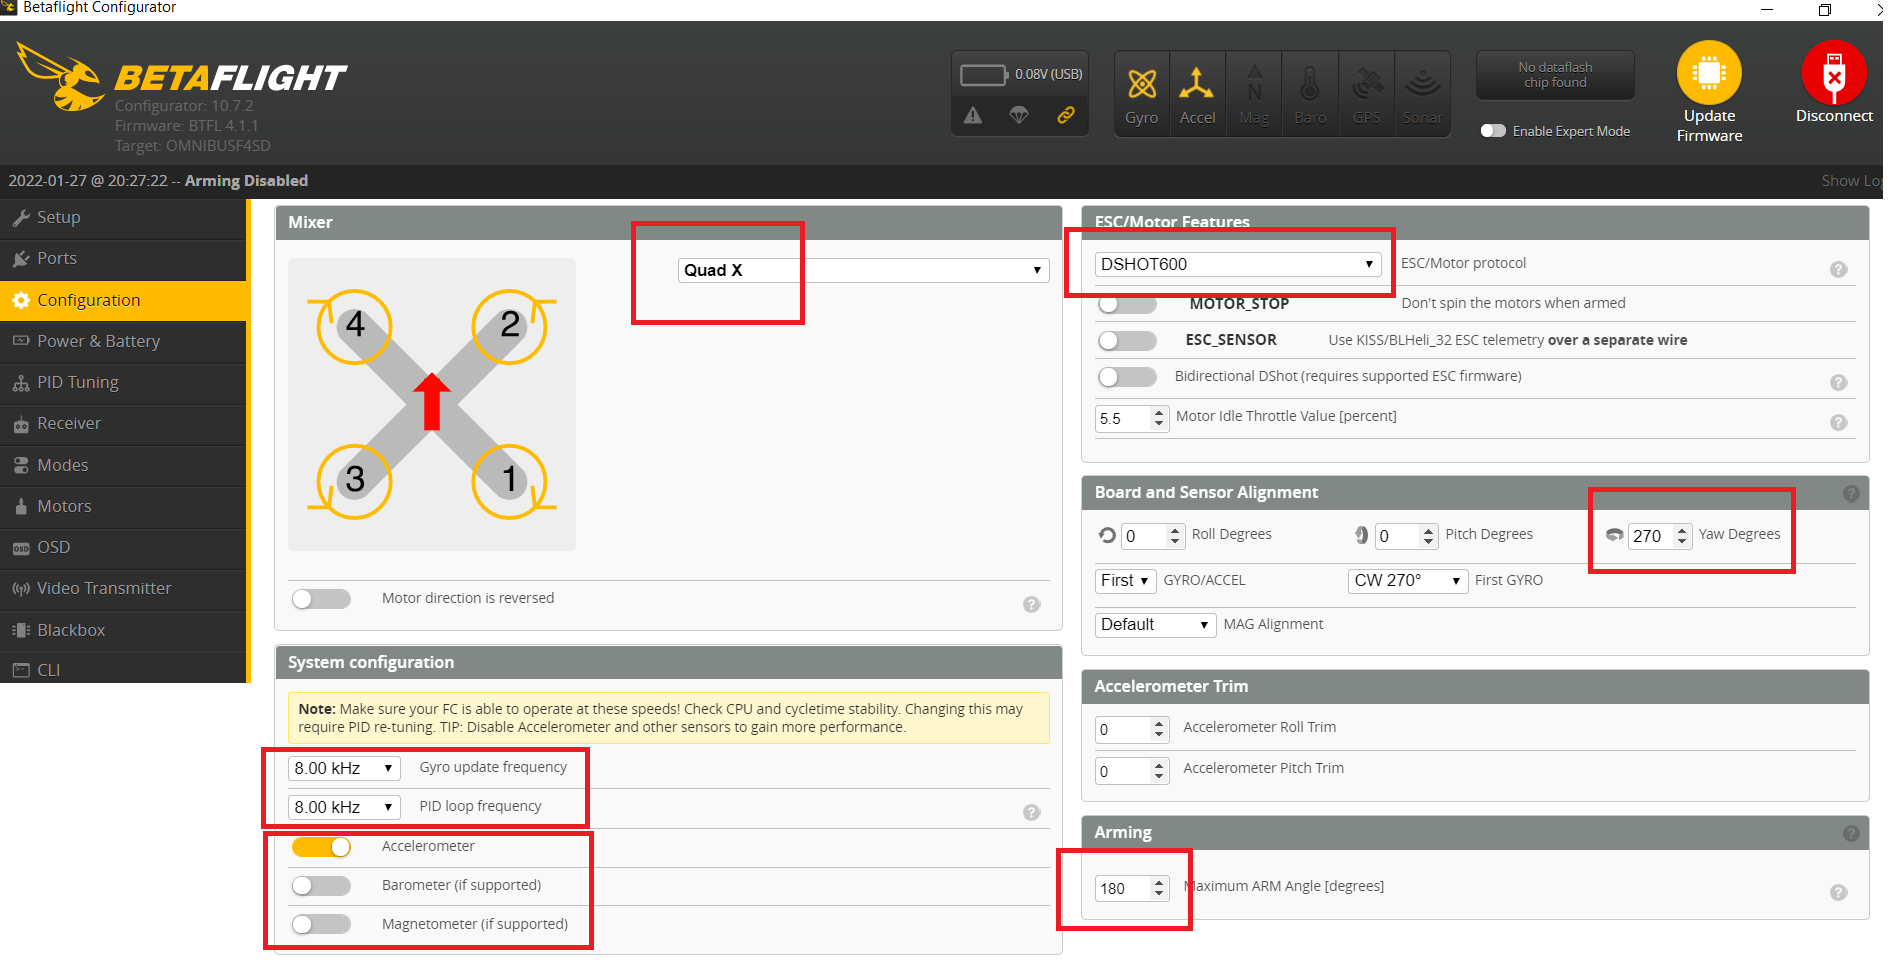
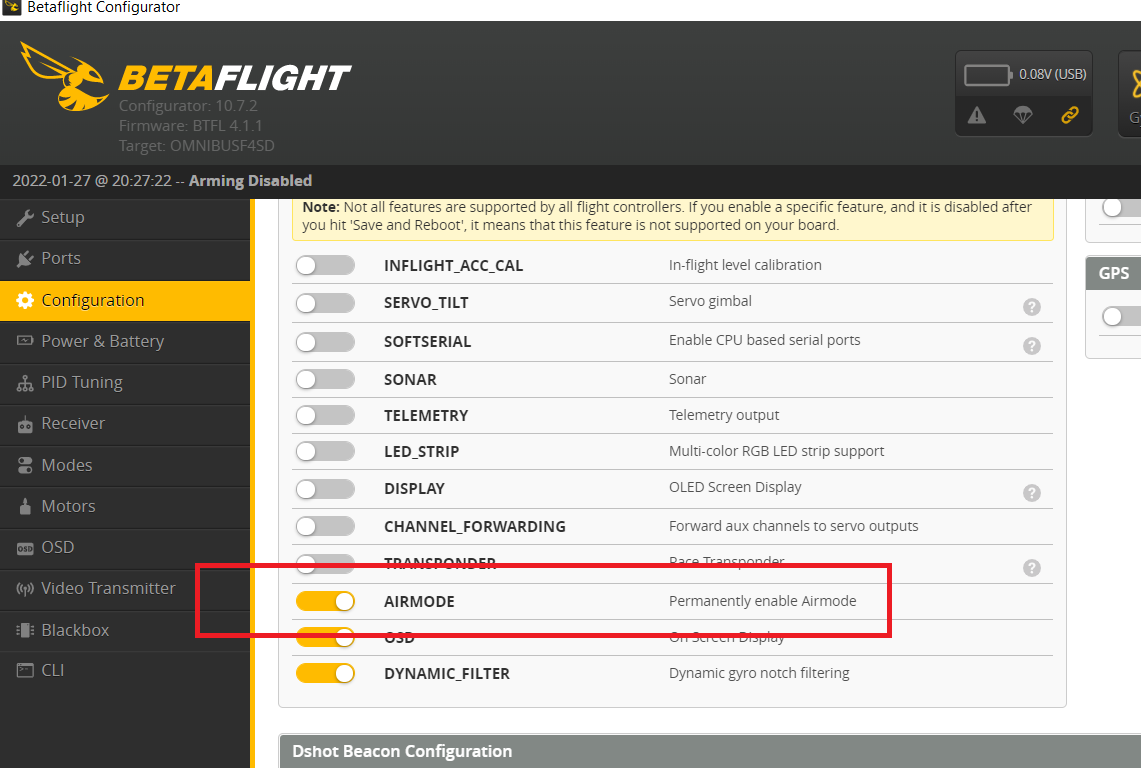
- Airmode : turning this on will allow you to steer the quad in the air when you are letting it fall. IE: you have cut throttle.
- SBUS connected receiver (mine is FUTABA)

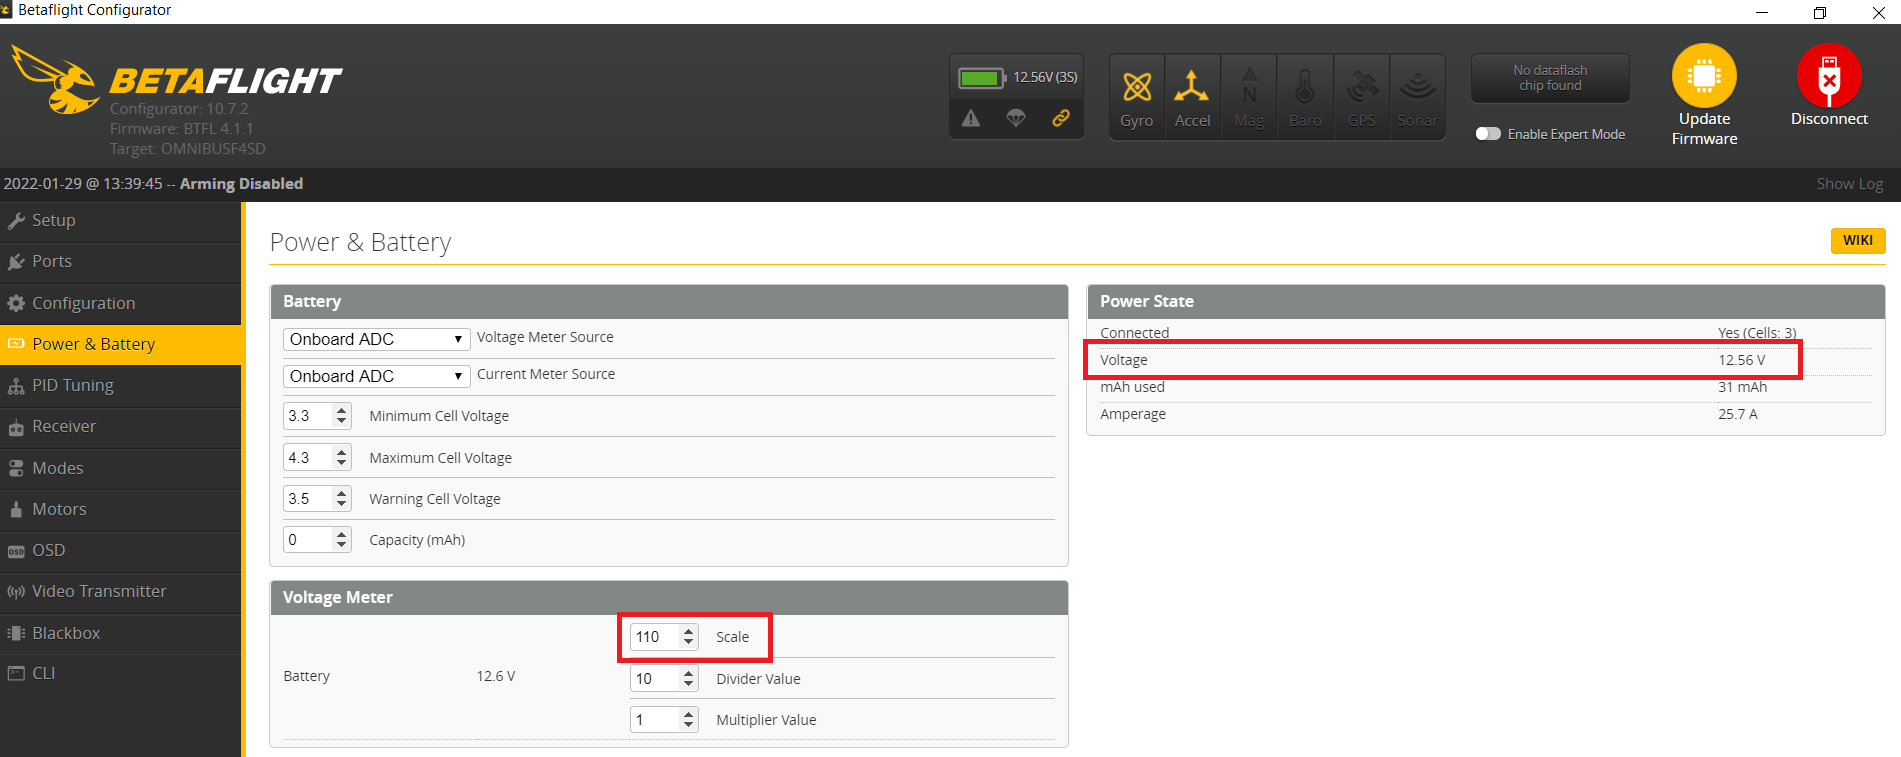
Power & Battery
Check the total battery voltage with a muiltimeter, this should be the same as the voltage shown in betaflight. If its not drop the scale values until the shown voltage is the same.
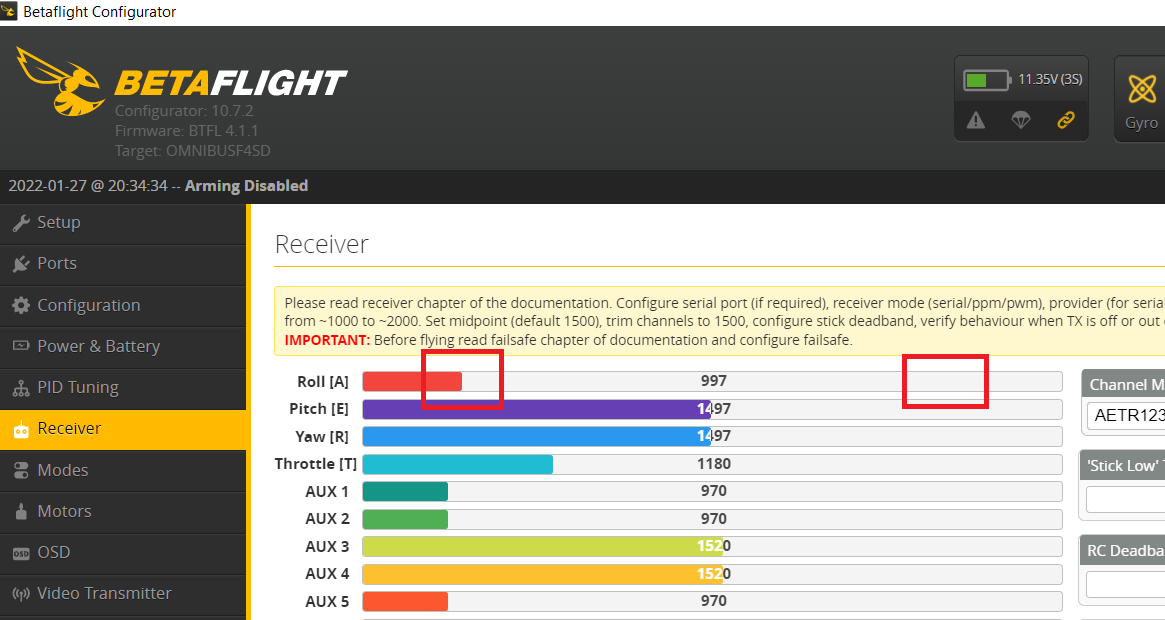
Receiver
Remove the props and power on the quad & radio. Then check the preview - the quad will probably be rotating or moving slowly.

- Use
SUB TRIMto trim these as close to1500as you can get them.
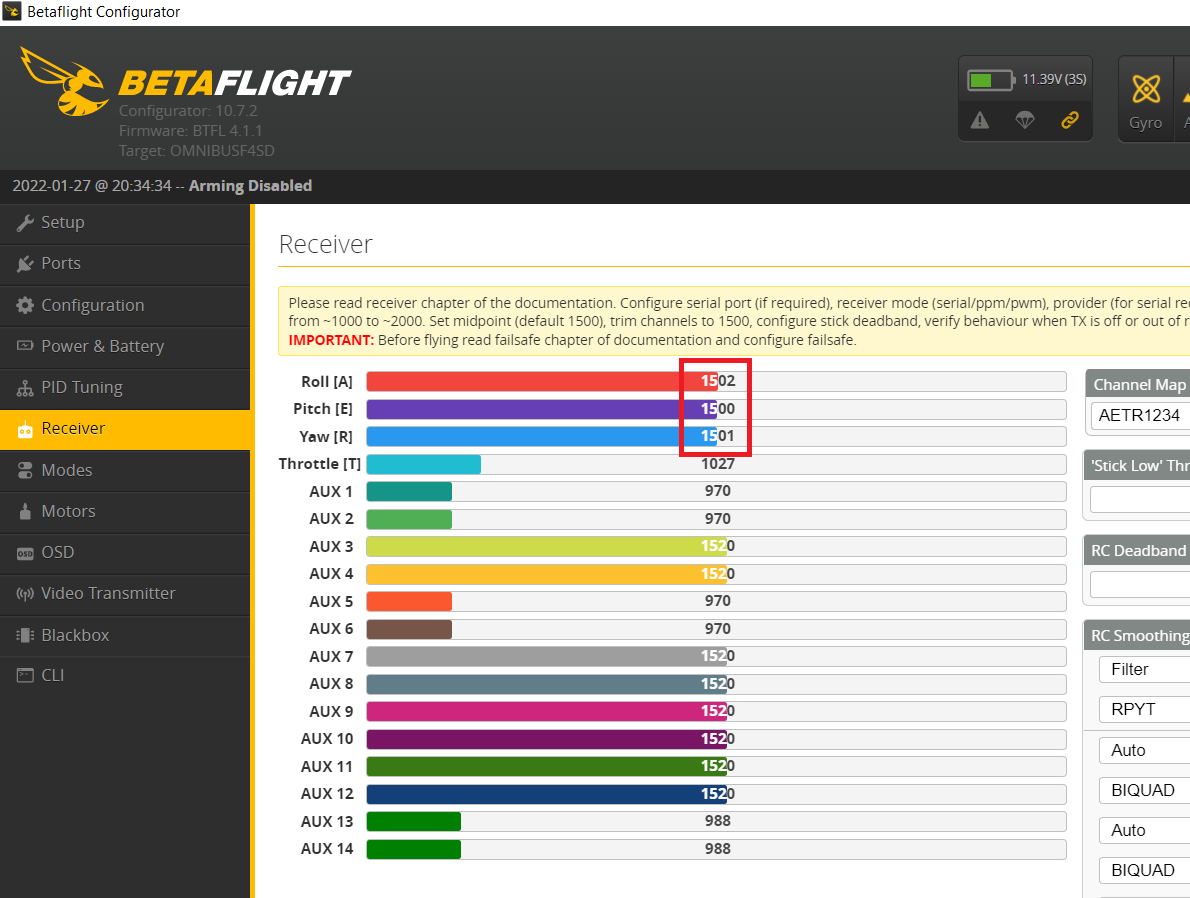
- For
Roll,PitchandYawmove the radio sticks to their extreme end points and useEND POINTon your radio to to trim as close as you can get to1000and1500
Modes
- Arm : I use the far left switch F (AUX 1) to arm ON/OFF
Angle,HorizonI use switch C (AUX 2) to activate. Its a 3 position switch, up isAngle(self level mode). Middle isHorizon(Keeps pitch you set it at so you have to level it yourself). Down isAcromode which means its all you :D

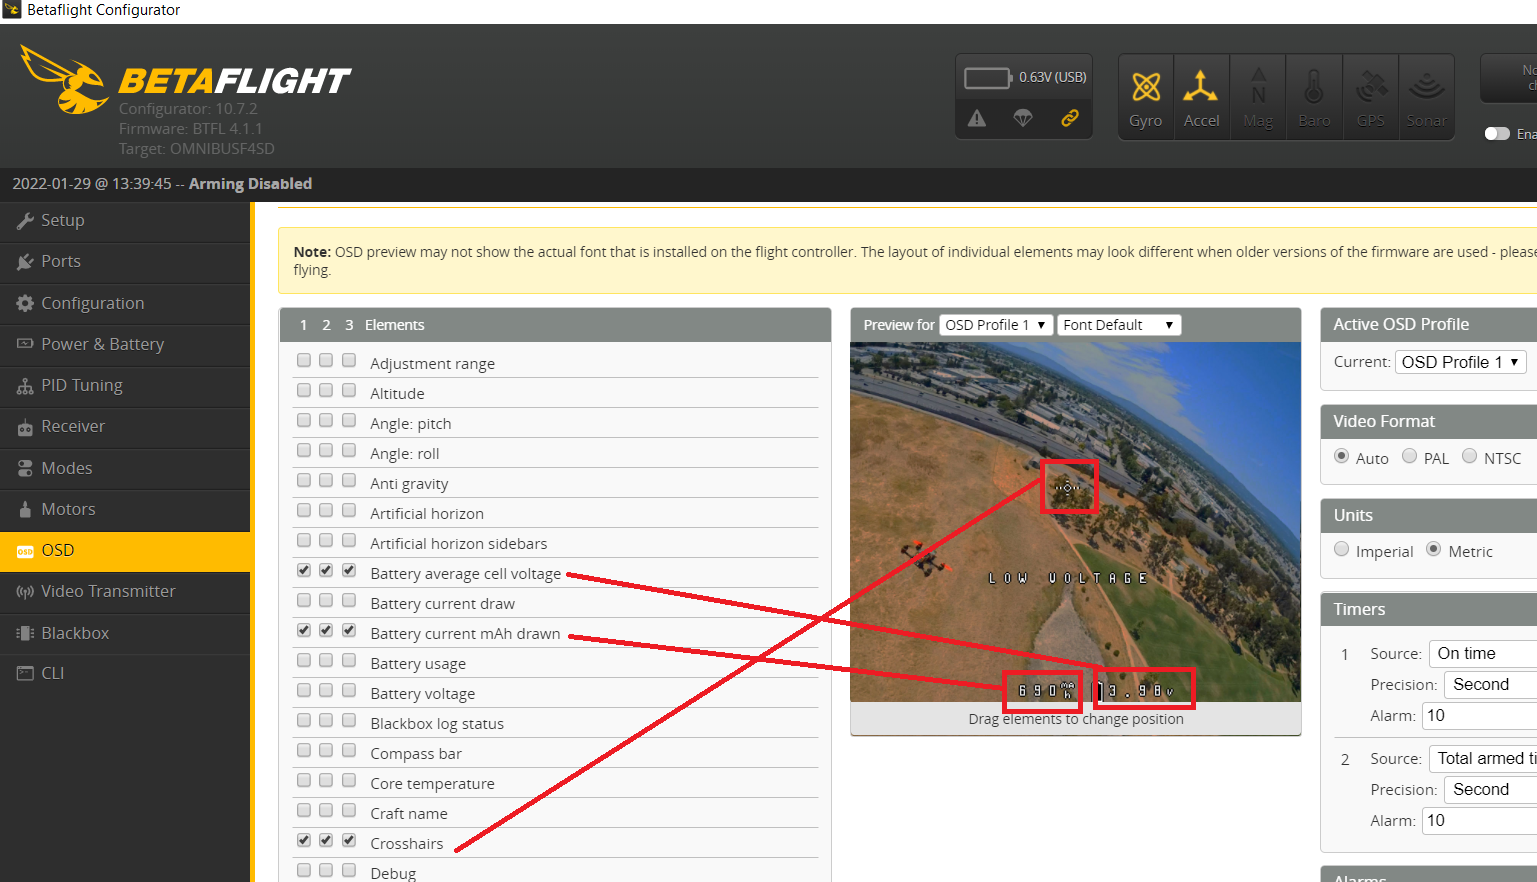
OSD
These are the on screen display values that I thought would be useful - they are overlayed into my goggles and I can drag them around so they display where I want them to be.
- Battery average cell voltage
- Batter current mAh draw
- Crosshairs
Motors
Allows you to check the correct motors spin up, this confirms the orientation of the quad (front and back) and is helpful if you did not check the flight controllers arrow and set that to face forward.
- Note this is NOT affected by
Configuration->Board and Sensor Alignment->Yaw Degrees - See CLI
mmix
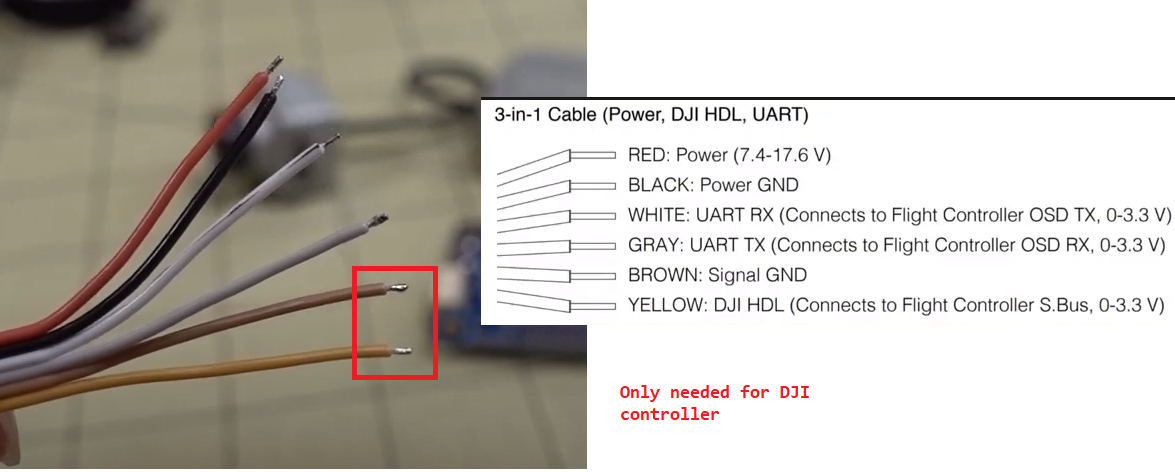
DJI Air Unit
Wires
If the flight controller doesnt have a DJI port (eg OMNIBUSF4SD) its still possible to solder it in, just make sure if you are using 6S you run though a BEC/Regulator.
The BEC is always ideal as it will give continuous clean power, the example in the video below was a 8V 3AMP (8x3 = 24 watts of power).
The air unit only needs 4 to 9 watts but its better to have more avalible to it (it will only draw what it needs). Apparently it will draw as much as 16 watts.
Common regulators are 9V 2AMP (9x2 = 18 watts)
If you are just running 4S then you can just use VBAT off the flight controller.
Region & Power changes
- The Air Unit allows you to set the region with a text file
naco.txt, set the region 1 (Country=US, Radio mode=FCC) - Save to the root of your SD card and pop it into the Air Unit
1 | naco.txt |
- The Goggles allow you to set the power with a text file
naco_pwr.txt - Save to the root of your SD card and pop it into the Goggles, this will allow up to
1000mwof power output (default is25mw)
1 | naco_pwr.txt |